This article originally appeared in the April 2021 edition of SoundonSound Magazine
Why let guitarists have all the fun? Stompboxes can be inspirational mixing tools.
Over the last few years, despite having plenty of outboard gear and plug‑ins to choose from, I’ve increasingly found myself using guitar pedals while mixing. It started as a way to access specific effects that I couldn’t find in software form, but my experiments have led me to realise just how much potential my pedalboard has as a mixing toolbox. In fact, so useful have I found pedals when mixing that I’ve developed an entirely new workflow to accommodate them.
In this article, I’ll take you through what you need to know if you want to use pedals in this way, explaining how to hook them up and offering some examples of how I like to use pedals when mixing.
Tactile Toys
So what’s the attraction of pedals compared with plug‑ins or rackmount gear? I still use both of those, of course, but pedals inject more excitement into the process because they give me immediate hands‑on control of all the essential parameters. There’s no messing about with a mouse or configuring a MIDI controller and, unlike with rack gear, everything can be laid out in front of me. In fact, it’s rather like performing with a synth. This fun, experimental approach can lead you to rewarding results when mixing on your own, but it can also be a great way to involve clients: chain multiple pedals together, invite the artist (maybe not the bass player!) to take control of one and you might just capture something wonderful!

I’m not alone in enjoying this way of working. In fact, some of the world’s best‑known engineers, have been doing it for years. Joe Barresi (Queens of the Stone Age, the Melvins), for example, started down this road years ago, as he explained in a 2016 interview with pedal manufacturers EarthQuaker Devices: “Back in my early days it was out of necessity because you couldn’t afford a $4000 Eventide Harmonizer, or a $6000 reverb, or whatever, so you bought a $50 guitar pedal and turned your volume down going into it. This was before reamps. We didn’t know what reamps were. We just turned the signal coming off the tape machine down, or fed it off a send on the console.”
But he found more to enjoy than keeping the costs low: “When you have a piece of gear in a rack, it tends to sit in the back of the room on a preset or two, but you don’t really tend to play with it as much as you do when you’re reamping with guitar pedals. That, to me, is definitely a more performance‑oriented way of making of music.”
On The Level
If you’re new to using pedals in a mixing setup, you probably have questions about connecting unbalanced instrument‑level pedals to your audio interface. Googling for information might give you an idea, but there’s plenty of misinformation out there, so I’ll try to set that straight here.
First, note that, as when connecting any outboard gear to an audio interface, your interface must have at least three outputs, since you’ll need two for stereo monitoring. I can’t think of an interface with three outputs so, realistically, a two‑in, four‑out interface is the minimum requirement.
You can connect the output of the last pedal in your chain to your interface’s high‑impedance (or ‘Hi‑Z’) instrument input, just as when recording a guitar/pedal setup direct. If your interface doesn’t have such an input, you’ll need a DI box between the pedal and the interface’s mic input. Level mismatches are more of a problem at the other end, where the line‑level signals from a typical audio interface are much higher in level/voltage than the instrument‑level signal most pedals are designed to receive. Some digital pedals from manufacturers like Eventide and Strymon can be set to operate at line or instrument level, but really, you want the option to use any pedal. Creative distortion has its place, but feeding a full line‑level signal into a pedal that expects a much lower level will generally just sound bad. To avoid overloading most pedals, then, you need a way to turn down that signal.
Another potential issue is that professional audio interfaces are generally intended to work with balanced signals, whereas pedals have unbalanced inputs. In practice, most interfaces are happy working with unbalanced gear but it does depend on how their outputs have been designed, so it’s a good idea to check the manual, to see if a specific type of cable is required.
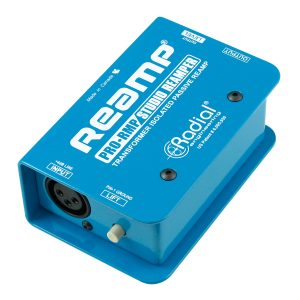
If you intend to use pedals a lot, I strongly recommend buying a Reamp® box. These take care of the level drop and the (un)balancing for you, and usually have a transformer inside, which can be useful in preventing ground loops. I’ve recommended some Reamp® options in the box elsewhere in this art; they needn’t be expensive, but if you just want to experiment, you may be able to get by with what you already have.
If you use a mixer, for example, you can try hooking the pedal(s) up to the mixer’s line I/O as a send effect, and use a channel’s aux send to control how much signal is sent to the pedal. If your audio interface has a headphone amp with an independent feed from the main stereo mix, you could try using a Y‑lead (ie. TRS to two TS jacks) to split the stereo headphone output and feed one channel to your pedal chain, using the headphone level knob to set the signal level. You could also simply attenuate the signal digitally, inside your DAW or audio interface routing software, and just use a standard line output from your interface. Alternatively, if you have one to hand, you can put a passive attenuator, such as a cheap monitor controller, between your interface and the pedal’s input. A passive DI box used ‘in reverse’ can make a workable substitute for a Reamp® box, as can a buffered‑bypass pedal with the bypass engaged. But, as I said earlier, a proper Reamp® box is my preferred option: it guarantees that you can hook up any pedal quickly and easily, and many also offer useful facilities like level adjustment.
Signal Flow & Latency

Figure 1 shows a basic interface/pedal setup. I actually use an SSL 2+ (two in/four out) interface, which allows me to create two mono send/return loops or one stereo/mono‑stereo loop, while leaving a stereo out for monitoring. But as the SSL’s unbalanced RCA outputs 3+4 aren’t the norm, I’ve shown a more typical Audient iD14 MkII, with all four outputs on TRS jacks. In the diagram, the interface’s outputs 1 and 2 are used for monitoring, so a line‑level signal comes from output 3 to a Radial Reamp® box, which delivers an unbalanced instrument‑level signal to an EarthQuaker Afterneath reverb pedal. The pedal’s output is connected to the Audient’s front‑panel high‑impedance instrument input. The complete circuit comprises just the interface, three cables, a pedal and a Reamp® box.
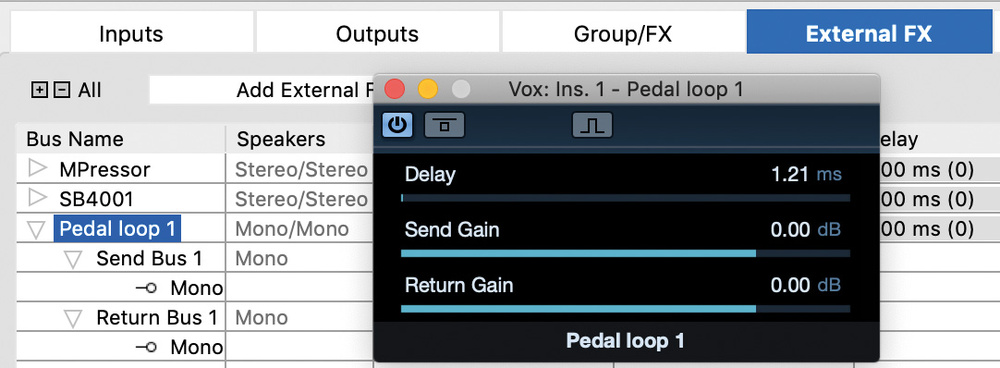
You also need to set up the routing in your DAW, and Figure 2 shows a simple way to do this. I’ve used Pro Tools 12, but although the way you configure this side of things is a little different in every DAW, all of them should be capable of this sort of routing, whereby the ‘Sarah Vocal’ track is routed to the interface’s output 3, and the ‘Pedal Return’ track’s input is the interface’s Input 1. Some DAWs, including Pro Tools, Cubase, Logic, Live and Studio One, allow you to set up an ‘external effect’ plug‑in, which can be a slicker approach: once configured, you can insert this routing plug‑in on a track, like any other plug‑in (though you can only have one instance per hardware output).

With native DAWs, you may encounter noticeable latency: the processed signal is delayed as it passes through your interface’s converters, buffers and any digital devices in your signal chain. This will be particularly obvious if you have a relatively high audio interface buffer setting, which many of us do while mixing because it places less strain on the CPU.
There are two aspects of latency to consider: first, how it affects what you hear as you tweak the pedal controls and thus your performance; and second, how the DAW compensates for latency when placing the recording on the timeline. If the former is a problem, you can use the usual latency‑busting remedies you’d opt for when recording, such as using your interface’s direct monitoring or reducing the audio buffer size. For the latter, the approach will vary according to your DAW.
Those ‘external effect’ plug‑ins I mentioned typically have a ‘ping’ feature, whereby they send an impulse through the (bypassed) chain and measure the offset between the sent and received signal. This allows them to declare the correct latency to your DAW’s automatic latency compensation system, which will ensure your recordings are correctly aligned. Where your DAW doesn’t have such a feature, you may need to measure the delay and compensate for it manually. To do this, make a recording on a track adjacent to the source signal, and zoom in on the two waveforms. You should be able to use your DAW’s timeline and selection tools to identify by how many samples the recording is offset. Then, use a plug‑in such as Pro Tools Time Adjuster to correct for it. (A freeware cross‑platform option for other DAWs is Voxengo’s Latency Delay, which adds no latency itself but allows you to specify the latency it declares to the DAW, so that the plug‑in delay compensation system will take care of things.)
Pedal‑powered Vocals
With everything set up, it’s all about having fun and exploring, and there’s really no end to the potential for creative sound‑shaping. Increasingly, I find myself reaching for pedals when working on vocals. Many types of pedal can work well for a vocal — your imagination and pedalboard are the only limits. For instance, although I’ve often used reverbs, echoes and pitch‑shift effects on vocals, the pedals I instinctively reach for most often tend to be overdrives, distortions and fuzz effects. The SansAmp Classic, used in parallel, has been a studio‑staple ‘vocal‑grit’ effect for years, but you can try any such pedal you have in this role. There’s something so primal and aggressive about using a pedal like this on a voice; it’s always an inspiration to start twisting the knobs and find something exciting. As well as being fun, though, a guitar distortion pedal on a parallel track also allows you to dial in a different sound from what you can get with plug‑ins or outboard.
Here’s an example to illustrate that point. When I was mixing London‑based metal band Ithaca, I had reached a point where singer Djamila’s aggressive vocals were working in the mix, but I wanted to elevate them somehow. Initially, I reached for my Thermionic Culture Vulture, which is a wonderful bit of tube‑based rack gear that I use often, and which costs many times more than even a pricey pedal. But in this case it just sounded too ‘pretty’, and my thoughts turned to pedals.
I tried my Electronic Audio Experiments Longsword op‑amp‑based drive pedal and, with the gain control at about three o’clock, I dialled a sound in using the bass and treble shelving filters. This enabled me to get a pleasingly thick low end while also slightly taming the high end. The Longsword has a semi‑parametric midrange control, and I used that to apply a generous mid boost. Added as a parallel effect, this gave the vocal the extra presence and prominence it needed, providing the aggression and force that made it sit nicely in a pretty dense mix.
For this sort of experimentation, you need the routing to be quick and easy. In this case, I sent a signal from Pro Tools out to the pedal using a Radial EXTC 500 module that’s permanently plumbed into our studio’s Looptrotter 500‑series console. This meant I could have the pedal up on the console for easy tweaking while sitting in the monitoring sweet spot. The signal coming back from the pedal was quite hot, but I didn’t want to change the pedal’s controls. Thankfully, the EXTC 500 has convenient send and return level controls, so after a quick tweak I was ready to print the track into Pro Tools. Could I have done the same thing in software? Something similar, perhaps, but not the same — and, importantly, I don’t think I could have got anywhere near quite so quickly. Nor would I have had so much fun while doing it.
Other Sources
Pedal processing needn’t be limited to vocals, though. In fact, I’ve found drive pedals to be extremely useful on other elements in the mix, particularly if used in moderation: you can achieve some lovely analogue saturation effects that it probably wouldn’t even occur to you to look for when using plug‑ins.
For instance, I recently mixed an album for a new West End musical. Due to the UK’s Covid‑19 lockdowns everything on this project was done remotely, so I’d not done the recordings myself as I usually would. Instead, I received stems that had been recorded in various locations by several different people, and the recordings were varied in both level and quality. I was also working on a different system, without access to my console.
On one song, I felt that the Nile Rogers‑style guitar riff that led the intro section needed work. The fundamental problem was the choice of tone used at the recording stage, but I’d not been given a DI part so was rather stuck with what I’d been given. My usual mixing techniques (automation, compression, EQ, saturation and so on) just couldn’t seem to coax out a sound I liked so, deciding I needed to try something different, I took a few pedals off my shelf and routed the track from an aux send in Pro Tools through my SSL 2+ interface into a Radial ProRMP Reamp® box.
After testing a couple of different drive pedals (Hudson Electronics Broadcast, Ibanez TS808) I landed on the Electronic Audio Experiments Halberd. This seemed to elevate the guitar with a sweet, but not too crunchy, medium‑gain transistor sound. This vastly improved note clarity and gave the low mids a nice push. It totally solved my bland guitar‑riff issue and ensured it could both settle into the mix and still be heard against the rest of the busy track. I DI’d the post‑pedal signal using the SSL’s high‑impedance input back into Pro Tools and replaced the original track.
All Together Now
If you have a setup that makes it easy to access your pedals, you can put them to work during recording sessions too. If you’ve ever been a band member on a long studio session, you’ll know that there can be a lot of waiting around. As the producer, you really need to keep band members’ interest and energy up, even if they’re not really involved in what’s currently going on, and I’ve found that when the pedals come out, everyone is interested!

When tracking the drums for London band Bad Progress’s debut EP, we were using an acoustic drum kit but decided that we wanted to create sounds that couldn’t be achieved acoustically. A drum machine would have been an obvious option but, before we went down that route, we multed the kick channel on the studio’s SSL E‑series console and tried patching the mult into some pedals. The kick drum, miked with an Electro‑Voice RE20 just inside the sound hole and an API 512 preamp, proved to be a perfect trigger for the pedal effect: first, the song’s drum arrangements were heavily based around the kick drum; and second, this signal didn’t have too much by way of spill, and certainly there were no washy cymbals to get in the way.
We tried several pedals, including an Eventide H9, MXR Analog Chorus and a Metasonix KV‑100 but finally decided on a Moog MF‑102 Ring Modulator. We found that if we played with the controls while drummer Joe was playing, it gave us the weird glitchy sort of sounds we were searching for. Technically this was very simple to set up, as the MF‑102 is happy to receive a line‑level signal. I was able to patch this straight from the console patchbay with no need for a Reamp® box. I routed the line‑level output back into the patchbay and into a line amp in the console.
I handed the MF‑102 to the band’s singer, Zygmunt, and let him interpret the song using the pedal while we were recording the drums. He had a great time performing with it, riding the LFO rate and Frequency controls to create some wild glitchy, modulated effects, with a big squelch if pushed to the extreme. The MF‑102 also has a wonderful drive section, which we ended up turning up to its maximum position. It sounded great. In fact, the Moog was the star of this show — this channel ended up being an important part of the band’s drum sound, and when they revisited for their next EP we had the MF‑102 patched in from day one.
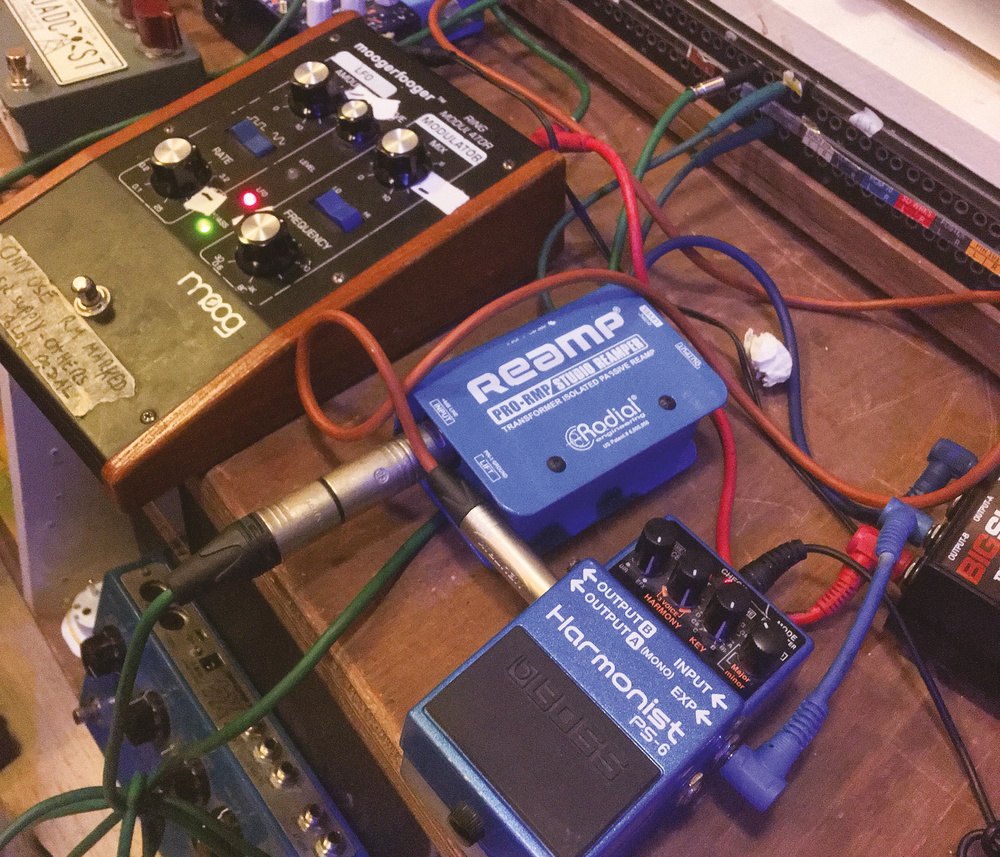
On the same project, we also found ourselves using pedals when mixing the vocals. Notably, we ran Zygmunt’s vocals through multiple chains to enhance a large crescendo in the song ‘It Can’t Be Good For You’. This included using the classic Boss DD‑3 pedal to create some warped delay/pitch effects, by messing with the delay time and feedback controls. We also used a Boss Harmonist PS‑6, creating some pitched rising effects by putting the pedal in its S Bend mode and holding the switch down at different sections of the arrangement. Earthquaker Devices’ Bit Commander was also useful for performing some grainy bit‑crushing, and the Electro‑Harmonix Bass Micro Synth gave us control over a nice resonant filter. For this setup, I ran an effects send from Pro Tools, through the patchbay, into a Radial ProRMP box. This went to the pedals and returned into the box via the instrument input of an API 512 preamp.
We found that being able to sit next to each other at the console and control the different parameters of the pedals both inspired us and really pushed our creativity. It allowed us to react to the music and create something unique together — a song with a lot of momentum and an ‘organic’ sort of progression. Had we attempted simply to use plug‑ins to shape the sound, these creative moments would probably never have happened; craning over a mouse to draw in automation while band members stare at you or, worse, sit staring at their phones just doesn’t cut it sometimes!
Pedal Power
Hopefully, I’ve inspired you to consider the vast potential of stompboxes in the studio, and helped you figure out how to incorporate them into your own setup. There’s so much fun to be had, but they can also take you to places you just wouldn’t go if you were to stay in the box, or always choose the most expensive big‑name hardware. There are plenty of classic options to play with — the SansAmp I mentioned earlier, distortion boxes like the ProCo RAT used on a snare, and old EHX and Boss pedals such as the CE‑2 chorus, for example. But don’t limit yourself to those choices. Try anything, as you never know quite how it will sound on sources other than guitar. In fact, that pedal that you hated so much on guitar that it’s currently lying under a layer of dust at the back of the cupboard might be just the ticket on something else!
Reamp® Recommendations
There are lots of Reamp® boxes and effects‑loop devices to suit all budgets. One I use a lot is the Radial Engineering ProRMP. It’s a simple passive Reamp® box, with a ground‑lift switch, an output level control, an XLR input and a quarter‑inch jack output. Its output level control can be useful if you want to push a drive pedal a bit harder, or ease off the level going into a compressor. Roughly the size of a typical computer mouse, it’s not obtrusive on a desktop or on top of a rack, and takes up little space in your kit bag.
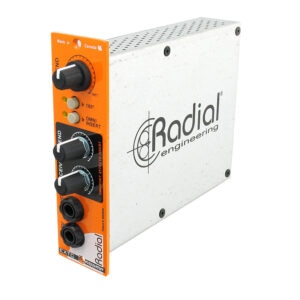
I also use the Radial EXTC 500, a 500‑series module that takes care of all your I/O needs and doesn’t require you to route back to your DAW via a preamp. Features include a dry/wet control, polarity‑invert switch and send and receive level controls. This gives you tons of control over your signal chain, for example allowing you to push that drive pedal input harder or dial back a ferocious fuzz on its way back to your DAW. The EXTC 500, which costs just under 300, features Radial’s class‑A buffer for fantastic audio quality and transformer isolation to eliminate buzz or hum. It requires a 500‑series rack, of course!
Is Impedance An Issue?
If you’ve read up on reamping, you’ll no doubt have come across the issue of impedance, with some people advising that certain pedals won’t sound right being fed from a low‑impedance source such as an audio interface, and that Reamp® boxes won’t solve the problem. When reamping a guitar signal there’s some truth in that, but it’s not really relevant if you’re just looking to use your pedals as processors and effects.
In practice, it’s only really a concern if you want to recreate the sound/feel of plugging your guitar with passive pickups directly into an analogue drive pedal, particularly if you like to ride the guitar’s volume control to hit a sweet spot. There’s actually one potential benefit in working with lower‑impedance sources such as an audio interface too, in that they can generally drive longer cables before you notice any ‘tone suck’.
Ground Loops & Power Sources
As when hooking up any analogue gear, there’s the potential when working with multiple pedals to create ground loops that cause unwanted buzz or hum. Using transformer Reamp® and DI boxes with ground‑lift options can help but, as cheap multi‑pedal power supplies are a common culprit (they share a ground between the pedals), you might want to look at your pedal power sources.
Separate class‑2 (double‑insulated) supplies won’t have their own mains safety earth, and thus won’t create ground loops. Alternatively, consider investing in a more expensive pedalboard supply — or if it’s an occasional or immediate issue, try using batteries where that’s an option. But do listen out for changes as batteries start to lose life!