The following is written by Eli Crews from TapeOp Magazine. See the Review Here
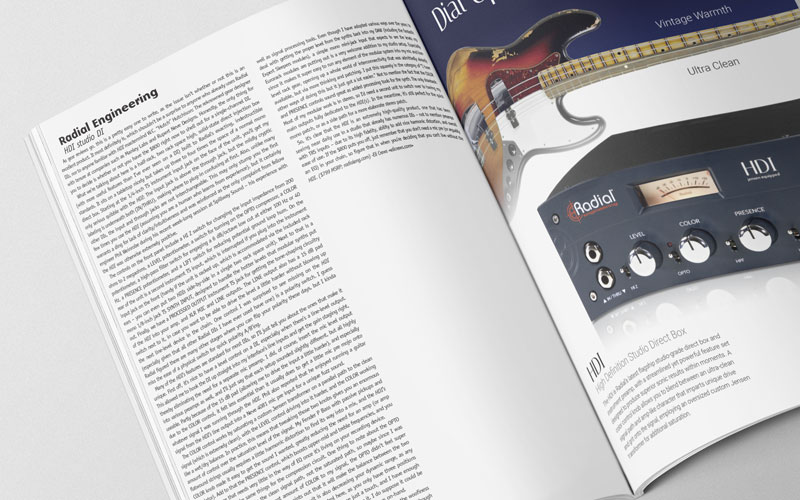
As gear reviews go, this is a pretty easy one to write, as the issue isn’t whether or not this is an excellent product. It most definitely is, which shouldn’t be a surprise to anyone who already uses Radial DIs, nor to anyone familiar with HDI mastermind W.C. “Hutch” Hutchison: The reknowned gear designer with tenure at companies such as Manley Labs and Rupert Neve Designs. Honestly, the only thing for you to decide is whether or not you have the $800 right now to shell out for a single-channel DI.
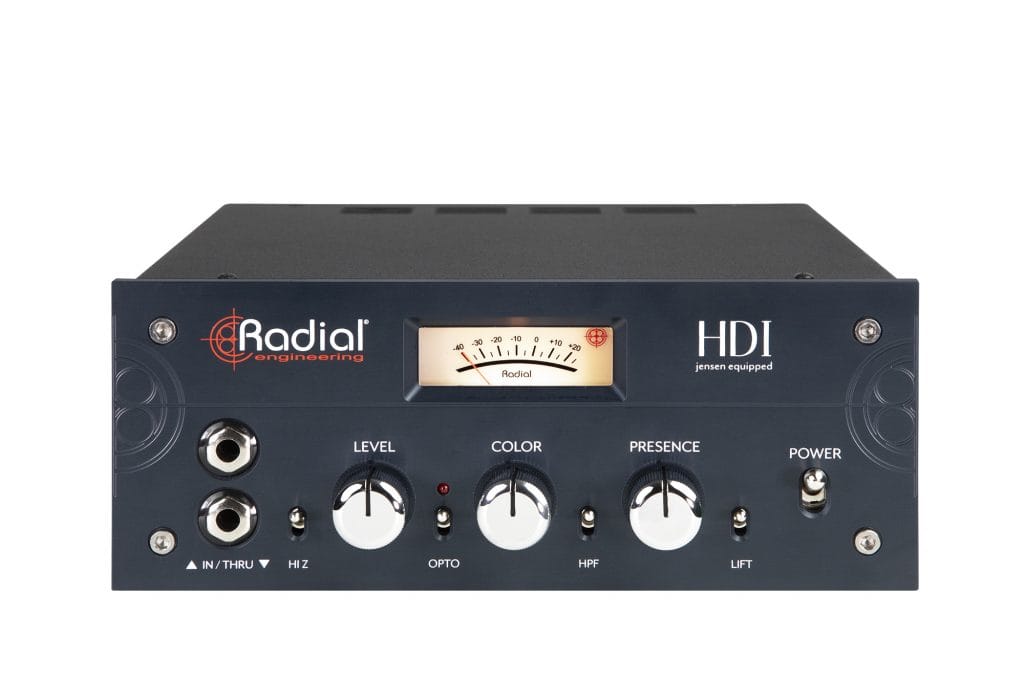
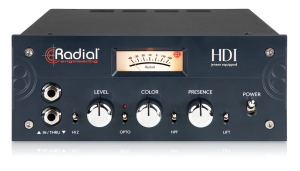
What we’re talking about here is a half-rack, two rack space high, solid-state direct injection box (with more useful features than I’ve ever seen on a DI) built to Radial’s exacting, indestructible standards. It sits on a tabletop nicely but takes up three to four times the space of a normal mono direct box. Starting at the 1/4-inch TS instrument input jack on the face of the unit, you’ll get my only serious quibble with the HDI: The input jack is above the through jack, but the mildly cryptic labeling is underneath both (IN/THRU), making where to plug-in confusing at first. Also, unlike many other DIs, the input and through jacks are not interchangeable. This may only stump you the first few times you use the HDI (assuming you are a human who learns from experience), but it certainly warrants a ding for lack of clarity/intuitiveness and was reinforced as the only complaint from fellow engineer Phil Weinrobe during his recent week-long session at Spillway Sound – his experience with the HDI was otherwise extremely positive.
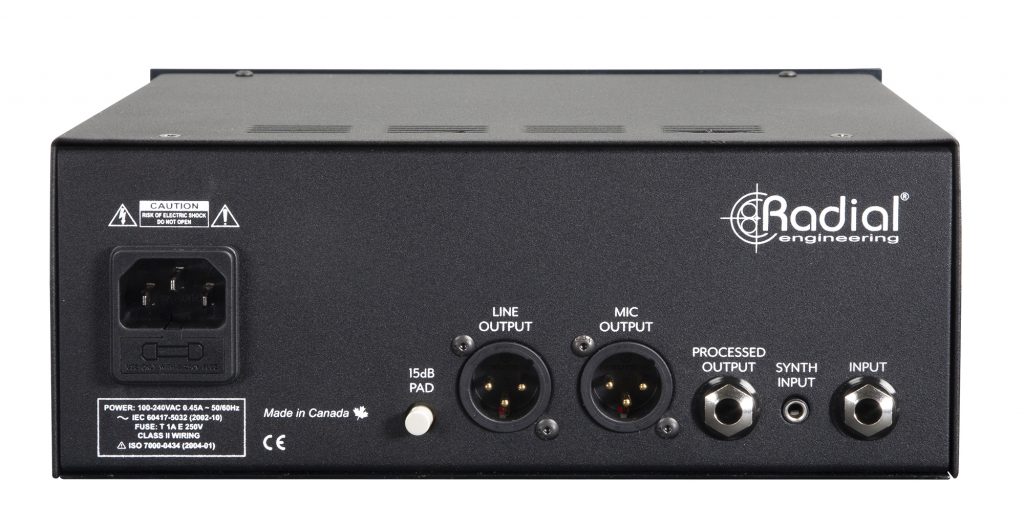
The controls on the front panel include a HI Z switch for changing the input impedance from 200 ohms to 2 megaohms, a LEVEL potentiometer, a switch for turning on the OPTO compressor, a COLOR potentiometer, a high-pass filter switch for engaging a 6 dB/octave low cut at either 100 Hz or 40 Hz, a PRESENCE potentiometer, and a LIFT switch for reducing potential ground loop hum. On the rear of the unit is a second instrument TS input, which is interrupted if you plug into the instrument input jack on the front (handy if the unit is racked up, which is accommodated via the included rack ears – you can even put two HDIs side-by-side in a single two rack space unit). Next to that is a mono 1/8-inch jack TS SYNTH INPUT, designed to handle the hotter levels that modular synths put out. Finally, we have a PROCESSED OUTPUT instrument TS jack for getting the tone-shaping circuitry of the HDI into your amp, and XLR MIC and LINE outputs. The LINE output also has a 15 dB pad switch next to it, in case you want to be able to drive the level a little harder without blowing up the next line-level device in the chain. One control I was surprised to see missing on the HDI (especially given that all other Radial DIs I have ever used have one) is a polarity switch. I guess Radial figured there are many other stages where you can flip your polarity these days, but I kinda miss the ease of a physical switch for quick polarity A/B’ing.
Many of the HDI’s features are standard for most DIs, so I’ll just tell you about the ones that make it unique. First off, it’s nice to have a level control on a DI, especially when there’s a line-level output. This allowed me to hook the DI up straight into my interface’s line inputs and get the gain staging right, thereby eliminating the need for a separate mic preamp. I did, of course, insert the mic level output into various preamps as well, and I’ll just say that each setup sounded slightly different, but all highly useable. Partly because of the 15 dB pad (allowing me to drive the input a little harder), and especially due to the COLOR control, it felt less essential than it usually does to get a little mic pre mojo onto whatever signal I was running through the HDI. Phil also reported that he enjoyed running a guitar signal from the HDI’s line output into a Neve 4081 mic pre input for a unique fuzz sound.
The COLOR control works by saturating a custom Jensen transformer on a parallel path to the clean signal (which is extremely clean), with the LEVEL control driving into it harder, and the COLOR working like a wet/dry balance. In practice, this means that tweaking those two knobs gives you an enormous amount of control over the saturation level of the signal. My Fender P Bass with passive pickups and flatwound strings usually requires a little harmonic distortion to find its way into a mix, and the HDI’s COLOR knob made it easy to get the sound I wanted, greatly reducing the need for an amp (or amp simulator). Add to that the PRESENCE control, which boosts upper-mid and treble frequencies, and you get a bass tone that needs very little in the way of EQ once it’s living on your recording device.
I can’t quite say the same things for the compression circuit. One thing to note about the OPTO circuit is that it only affects the clean signal path, not the saturated path, so maybe since I was almost always dialing in some decent amount of COLOR to my signal, the OPTO didn’t feel super necessary (although the Radial literature points out that it will make the balance between the two paths more consistent, given that the COLOR circuit is also decreasing your dynamic range, as any distortion/saturation does). I didn’t love the lack of control here, as you only have three positions for the switch – off, on, or more. To me, it dulled the performance just a touch, and I have enough compressors that I already love, so in practice I didn’t end up ever using it. I do suppose it could be helpful in a pinch, with a hyper-dynamic performance and no other compressors on-hand.
The high-pass filter switch is only active for the saturated signal path, to minimize the woofiness that can build up when you start adding harmonic distortion to your low end sounds. Even though I was mostly using the HDI on instruments with a fair amount of bottom, I rarely felt the need to engage this switch – although I appreciated having the option.
The last feature to discuss is the SYNTH input, which was honestly one of the reasons I was really drawn to check out the HDI. I employ a lot of modular synths in my work, both as instruments as well as signal processing tools. Even though I have adopted various ways over the years to deal with getting the proper level from the synths back into my DAW (including the fantastic Expert Sleepers modules), a simple mono mini-jack input that expects to see the levels my Eurorack modules are putting out is a very welcome addition to my studio setup. Especially since it makes it super easy to run any element of the modular system into my mic and line-level rack gear, opening up a whole world of interconnectivity that was admittedly already available, but via more thinking and patching. I put this squarely in the category of “I have other ways of doing this but it just got a lot easier.” Not to mention the fact that the COLOR and PRESENCE controls sound great as added processing tools for the synth. The only drawback: Most of my modular work is in stereo, so I’d need a second unit to switch over to having my main outputs fully dedicated to the HDI(s). In the meantime, it’s still perfect for the quick mono patch, or as a side path for a more elaborate stereo patch.
So, it’s clear that the HDI is an extremely high-quality product, one that has been seeing near daily use in a studio that already has numerous DIs – not to mention preamps with 1/4-inch inputs – due to its high fidelity, ability to add nice harmonic distortion, and overall ease of use. If the $800 puts you off, just remember that you don’t need a mic pre (or arguably an EQ) in your chain, so figure that in when you’re deciding that you can’t live without the HDI.